glamourmash
Showing posts with label My-Recipes. Show all posts

Tuesday, February 11, 2014

My Recipes // Donut Cookies (Just in Time for Valentine's Day!)


Every year, I bake Valentine's Day themed cookies or cupcakes and send them out to my 
family and friends with little love notes. It's been a favorite tradition of mine and this year 
was no exception. Whilst cruising Pinterest for inspiration, I came across a recipe for donut 
shaped cookies. Are you kidding me!? As if normal cookies aren't cute enough, they came 
up with DONUT SHAPED COOKIES! Radical.


So, last night I baked and frosted almost 50 cookies while drinking wine and listening to 
Billy Holiday. It was my own little version of therapy without the shrink. Seriously, I love 
laying out the ingredients, rolling the dough into perfect little balls and then baking and icing them 
into sweet, delicious perfection. Yes, I may have burnt my prized ham and bean soup while 
cooking the cookies, but it was worth it cause these things were GOOD!


Ingredients: 
1 Box Krusteak sugar cookie mix (yeah, I cheated. Sandra Semi-Homemade Cooking right hurr!)
I Cup Betty Crocker Whipped Strawberry Frosting
1/2 Cup Powdered Sugar
Sprinkles or sugar crystals to decorate 

Directions:
Bake cookies according to package. Let cool completely. Stamp out the middle with a round object hollow object. I used the cap from the sprinkled bottle because… necessity is the mother of invention. A round cookie cutter would have worked better but oh well! Whip together frosting and powdered sugar with a spoon. Ladle icing into a piping bag or Ziploc and pipe onto cookies. Smooth frosting into desired shape with a spoon and to with toppings of your choice. Yeah, it's that easy.

Monday, April 22, 2013

My Recipes // Breakfast Egg Fried Rice

Our life is getting a little bit back to normal {a.k.a. no epic work weeks, weddings or baby showers} so I have been able to get back in the kitchen and it feels so good! 

I love cooking and the rituals it brings about: cruising foodie websites to pull inspiration, writing up grocery lists, perusing the aisles at the local grocery or farmer's market, cuttting/slicing/sautéing/baking and serving the food on pretty plates. Oh, and the ritual part where you actually eat is pretty cool too.

I also love cooking for Clint. I guess it's the 1950's housewife in me that loves preparing a good meal for my man and watching him enjoy the fruits of my labor. It's very satisfying to see Clint clean his plate and then clean mine too :) And this meal was no exception.


Last week, my boyfriend and I went to our fave restaurant in Ocean Beach, OB Noodle House. If you live within 100 miles of San Diego, make it a point to visit OB Noodle House. It has the hands down BEST pho on the face of the planet! As is typical with us foodie fatties, we ordered w-a-y too much food and ended up taking home a bunch of leftovers. Feeling inspired the morning after our pho feast, I decided to whip up some Breakfast Egg Fried Rice using our leftover rice. 


Prep: 5 Minutes | Cook: 5 Minutes | Yield: 6 Servings {or 1 if you're hungover}

Ingredients:
4 cups cooked cooked white rice
3 eggs
2 tablespoons butter
1 teaspoon sesame oil
1 small onion, finely chopped
4 garlic cloves, finely chopped
4 tablespoons soy sauce
2 green onions, finely chopped
1/2 teaspoon fresh clack pepper
1/4 teaspoon garlic salt
Flat parsley or cilantro for garnish
(If you have some chicken, shrimp, beef or spam {I swear it is delicious in this dish} on hand, feel free to throw it in too! The same goes with frozen vegetables!)


Directions:
Saute butter and onions over medium heat for 3-4 minutes in a large skillet or wok. Add garlic and continue sautéing for another 2-3 minutes. Crack the eggs directly into the skillet and cook for about 1 minute, stirring often. While eggs are still a bit runny, add in the rice and the remainder of the ingredients and stir-fry toss the mixture for about 3 more minutes. Add in salt, pepper and soy sauce as needed to suit your taste. BAM! Breakfast is served.

Wednesday, April 17, 2013

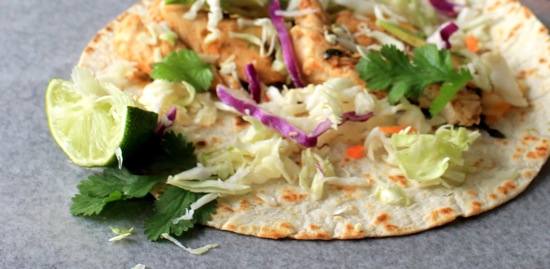
My Recipes // Adobo Chicken Tacos with Cilantro Slaw


San Diegans are incredibly lucky to live to close to Mexico. We carry the luxury of having authentic Mexican food at our fingertips at all times. Literally, there is a Roberto's Mexican Food on almost every street corner in the city and they are typically open 24-7... which is dangerous for those of us who like to have a late night snack after an evening of a few cocktails! There have been plenty of mornings when I wake up with a California burrito wrapper next to my bedside... my friends and I have even taken to calling the chain "Regretto's" because of the regret you feel the morning after stuffing our faces late night style with carne asada goodness!

With the Mexican food influence being so strong in my town, I have taken up trying to mimic the Mexican tastiness right in my own kitchen and the result is my Adobo Chicken Tacos with Cilantro Slaw! I created this recipe on the fly using chipotle in adobo sauce as the main star of the dish. If you haven't tried chipotle in adobo sauce before, you need to hop to it. The spicy, smoky flavor adds depth and lots of flavor to any dish. Boyfriend approved, these Adobo Chicken Tacos with Cilantro Slaw are a hit!


Prep: 5 Minutes |  Cook: 10 minutes | Yield: 3-4 servings

Ingredients:
1 pound skinless, boneless chicken breasts, cut into 1/4-inch strips
1 chipotle in adobo sauce, finely minced
1/8 teaspoon chili powder
1/2 teaspoon garlic salt
1/4 teaspoon ground cumin
1 tablespoon cooking oil
1 tablespoon lime juice and lime wedges for final product
1 cup packaged angel hair slaw
1/4 cup chopped fresh cilantro
salt and pepper to taste
8 6 inch flour or corn tortillas
1 sliced avocado

Directions:
Heat a large skillet over high heat. Add oil and garlic and sauté for 1 minute. Add chicken and sprinkle evenly with minced chile in adobo sauce, chile powder, garlic salt, cumin, and lime juice. Add salt and pepper to taste. Cook 4-7 minutes or until chicken is cooked through. Divide chicken evenly among tortillas and top with slaw, cilantro and avocado. Serve with some lime wedges and some extra slaw on the side to make it pretty, eh? Cause beautiful plating is half the fun! Enjoy!

Wednesday, February 27, 2013

My Recipe // Spaghetti With Fried Eggs and Pangritata

Have you all heard of Foodgawker yet? If not, allow me to introduce you to... 
THE MOST ADDICTIVE FOOD SITE KNOWN TO WOMAN!

Download the App or visit the website and prepare to gain back the freshman 15 you so struggled to lose these past few years! I'm not kidding. This website is like Pinterest for food. 

Foodgawker also has equally sinister sister sites including craftgawker, dwellgawker, stylegawker, oh, and weddinggawker ... also known as "time sucks."


So, it was in this little corner of the internets that I found the recipe for Rhonda's Spaghetti With Fried Eggs Pangritata For One. Ok, so maybe I made it for two and ate it for one but you won't tell anybody right? Cause we are friends of the internets :)

This pasta is seriously hearty and perfect for a meal or complimentary side dish. The yolks coat the pasta and the rosemary gives it a deep rustic flavor.   


Have you tried a pasta dish with egg before? It is to die! 

Friday, December 14, 2012

My Recipes // Homemade Twinkies


First of all, HAPPY FRIDAY! I don't know about you, but Friday sure took it's sweet ass time to get here! Hooray for the weekend finally! 

OK, so did anyone else completely wig out when they heard that Hostess was going Bankrupt. Even though I haven't had a Twinkie in years, the thought that I might never have the chance to bite into that over processed sugar puff again was unimaginable! 

True, I've avoided Twinkies for the latter part of my childhood and life because I know they are on the "no-no" eating list. Actually, they are on the "oh, hell no" eating list. Just too unhealthy. 

But now that Twinkie was on the mind, I felt the urge to have one. Instead of eating the real thing, I decided to try to recreate it myself. Here are the delicious results! Enjoy! 

Prep: 10 minutes | Cook: 22-24 minutes | Yield: 10-12 twinkies

Cake Ingredients:
16 ounce box golden pound cake mix
4 egg whites
2/3 cup water

Filling Ingredients:
1/4 cup crisco
1/4 cup unsalted butter
1 cup powdered sugar
1 teaspoon vanilla extract

Directions:
So, you can buy legit twinkie molds on the internets, but in a pinch, some tinfoil and a spice bottle will work just fine. Cut out 12 8"x12" inch sheets of aluminum foil. Fold the sheets in half lengthwise and wrap around spice bottle to create a mold. Leave the top of the foil open so you can pour batter in.


Arrange on a cookie sheet or pan. Spray molds with cooking spray! Don't forget this step like I did! 


Preheat oven to 325 degrees. Whip egg whites on high until stiff. Stiff means stiff. Still not sure? Dip a spoon in the egg whites and spin it in a circle. If the egg whites don't budge, it's officially stiff.

Add cake batter and water and mix on medium for 2 minutes. Divide batter evenly among molds and bake at 325 degrees until toothpick comes out clean when inserted into cake... about 22-24 minutes. Remove from the oven and loosen the twinkies onto a cooling rack. Let cool completely. 


Beat crisco and butter in mixer until creamy. Add powdered sugar and beat until light and fluffy. Add vanilla and beat for another minute. Put the filling into a pastry bag with a tip or a ziploc bag and snip off the tip.

Flip cakes over and with a straw, poke 3 holes in the twinkie. Place the tip of the pastry bag into each incision and squeeze cream into the incisions until full. 

Turn them back over and serve! Enjoy!


Thursday, November 22, 2012

My Recipes // Coconut Lime Noodle Soup

I have semi-mastered the art of cooking Italian, Mexican and basic American food but when it comes to more foreign cuisine like Greek, Chinese, Thai or French... I am completely and utterly lost, not to mention intimidated.  

Yesterday, I had a coconut based soup at a Thai restaurant and it was SO good. I figured that it would be an easy "foreign cuisine" starter dish to make so I got to work, researching recipes and basic thai flavors and spices to incorporate into the dish. 

I adapted a recipe from THIS website and came up with the following recipe. Let me tell you, it totally knocked me and my man's socks off! It was so delicious and so easy to make. The recipe calls for 4 servings but we quickly turned it into 2 servings. My tummy is so pleased right now.

Also, please excuse these horrible pictures! I guess splurging on a DSLR camera doesn't automatically make you a professional photographer like I thought! Shoot. Seriously, though. Shoot and FAIL.


Prep: 10 minutes | Cook: 10 minutes | Yield: 4 servings

Ingredients:
1 pound boneless skinless chicken breast, thinly sliced
12 pound medium or large shrimp, shelled and deveined
32 - 48 oz low sodium chicken broth (you can dilute the coconut flavor by adding more chicken broth)
1 can (13.5 oz) coconut milk
4 tablespoons lime juice
3 tablespoons fish sauce
2 teaspoons brown sugar, white sugar or agave nectar syrup
1 teaspoon diced ginger
1/2 teaspoon crushed red pepper
3/4 pounds fresh thick udon noodles
3/4 cup packed fresh cilantro
3/4 cup crimini mushrooms

Directions:
Bring chicken broth and ginger to a boil in a large saucepan. Turn the heat down and simmer for 10 minutes.

Add the coconut milk and bring to a simmer again. Add shrimp, chicken and mushrooms and cook for 3-4 minutes, or until chicken and shrimp are cooked thoroughly.

Stir in fish sauce, sugar, crushed red pepper, lime juice, noodles and 1/2 cup cilantro. Set simmer 1-2 additional minutes or until noodles break up. Serve immediately! Yummm time!


Wednesday, September 5, 2012

My Recipes: Spiced Wasabi Kale Chips

Come on. Everybody's doing it! So why don't you!? I'm talking about kale chips, people! They are deceivingly delicious, super healthy and easy to make! 


If you haven't gotten on the kale chip band wagon, get on it already! I know, I know. At first I was like "ugh, leafy greens trying to pawn off as a yummy snack... no thank you," but I swear to you, Kale Chips are the bomb.com

I've whipped up a fun take on the traditional kale chip: spiced wasabi kale chip. Don't like wasabi? Cut it out of the recipe and stick with the original. 


Prep: 5 minutes | Cook: 20 minutes | Yield: 2-3 servings

Ingredients:
1 large bunch kale (kale shrinks down a lot while baking so layering on baking sheet is ok)
2 tablespoons olive oil
1-2 teaspoons salt to taste
1/4 - 1 teaspoon wasabi powder to taste

Directions:
Preheat oven to 300 degrees F. Remove the ribs from kale and tear or cut into bite size pieces. Lay on baking sheet and toss with olive oil, salt and wasabi powder. Bake until crisp (but not brown), turning or tossing halfway through. The chips will store for about a week but you will probably eat them within minutes of pulling them out of the oven. Enjoy!

P.S. speaking of food, you MUST check out this new foodie blog I found today, Lottie and Doof. After paging through just a few posts, I know this is a new favorite! Food photos be making me starving! 


Friday, August 24, 2012

Holly's Favorite Cocktails: Dirty Shirley

I'm guest posting over on the fabulous blog of the talented and beautiful Tiffany Leigh. Please make sure to stop by her blog to check out my guest post for her series "Favourite Furniture Fridays." As I discuss in the guest post, I LOVE entertaining so I decided to showcase my tall dark wood bar cabinet from Z Gallerie.
Of course, what's a party without a great cocktail in hand? So today I wanted to share with you my all-time favorite cocktail: The Dirty Shirley. It's like a Shirley Temple, but all grown up... and with vodka! Go ahead and get the party started with my recipe for the perfect Dirty Shirley. Warning: you will like this. A lot.


image credits // 0 1 2 3 4 5 6 

Also, don't forget to check out my post about Bar Essentials HERE. I break down how to further get the party started.


Thursday, August 16, 2012

SHARK WEEK

I scream, you scream, we all scream for SHARK WEEK!!!!!!

Does anyone else around here just completely lose their shit during Shark Week? I am totally glued to the TV and agitated with anything that interrupts my viewing time. Nothing gets between me and my shark.

Unless, of course, it's a Shark Week Party... In honor of this epic week of fantasticness on the Discovery Channel, I threw a Shark Week Party at my house last night and it was a blast. I wanted to make some kind of shark themed cocktail and snack for the party. I finally settled on shark cookies decorated to look like the Jaws Movie Poster. I admit, I was lazy. I used pre-made sugar cookie mix and buttercream frosting which I dyed blue for the body. I then piped on black frosting for the mouth and eyes. 


My boyfriend made ahi poke and actual shark so we could eat shark while we watched sharks... is that messed up? Maybe, but it was delicious!

Finally, I made some "shark infested waters" cocktails, which is two parts Bacardi Zombie mix, 1 part 7-Up, 1 part Lemonade, 1 part Vodka and a splattering of swedish fish and a cocktail umbrella for looks.


Is anyone else out there loving Shark Week?


Monday, August 13, 2012

My Recipes: Fresh Pesto


If you haven't noticed, I am totally and completely obsessed with pasta. There's something therapeutic about bringing the water to a boil, dropping in the pasta, checking for the perfect al dente taste... it just feels good and it feel just right. Pasta always has been and always will be my comfort food. Here's my recipe for basil pesto, adapted from one of my family friends who just happens to be a fantastic chef... and French. So she knows her shit. 

I made this pesto on my lunch break on Friday. I noticed that our basil plant was getting a little unruly so naturally, I took it as a sign direct from the heavens above to make pesto. I ate pasta for lunch, went to the Del Mar Horse Races (cause a belly full of pasta is a good look when I'm about to put on a dress, ha), and then came home from the races a few cocktails too many, so I had some more. mmm mmm mmm.

Buon Appetito My Friends:)

Prep: 5 minutes | Cook: 1 minute | Yield: 1 cup

Ingredients:
2 cups fresh basil leaves
2-3 cloves garlic
1/4 cup pine nuts
2/3 cups REALLY good olive oil
1/2 cup freshly grated pecorino cheese
kosher salt and pepper to taste
a few shakes of red pepper flakes for a tiny kick
a small squeeze of lemon juice... a teaspoon or so
(substitute walnuts for pine nuts for a fun change of pace)

Directions:
Literally, get the ingredients together and blend them in a food processor or a Bullet. No need to prechop anything and honestly, you don't even need to grate the cheese. I only say to grate the cheese so you can get the measurements correct. Eyeball it if you like. Heat the mixture up in a pan or the micro and top it on your fave pasta. Make sure not to overheat the mixture as it will start to come apart and get oily.


Thursday, July 5, 2012

My Recipes: Chili and Lime Tortilla Chip Tapas

I've been making the chile and lime chip in this recipe for years. They are really easy to make and SO much better than anything you can buy in a store. The "tapas" part was just made on the fly with the ingredients I had on hand and it ended up being pretty darn tasty.


Prep: 10 minutes | Cook: 15 minutes | Yield: 6 servings

Chip Ingredients:
1 (12 ounce) package corn tortillas
1 tablespoon olive oil
3 tablespoons lime juice
1 teaspoon ground cumin
1 teaspoon chili powder
1 teaspoon salt (kosher salt is my fave)

Tapas Toppings:
1/4 cup crumbled cotija cheese
1 avocado, sliced
3 tablespoons cilantro
lime wedges for garnish
salt and pepper to taste

Directions:
Preheat oven to 350 degrees. Cut each tortilla into 8 chip sized wedges and place on a nonstick cookie sheet in a single layer. Mix lime juice and olive oil in a small bowl. Using a cooking brush, brush the solution over the chips so that they are slightly moist. Combine other spices in separate small bowl and sprinkle on top of chips. Bake for 12 - 15 minutes, checking occasionally to make sure chips don't burn. When chips are crisp, remove from oven and arrange on a plate. Sprinkle with tapas toppings and enjoy!


Friday, June 1, 2012

My Recipes: Spaghetti with Browned Butter, Garlic and Mizithra Cheese... This is Wifey Material Right Hurr.


My latest creation is inspired by, of all places, The Spaghetti Factory.

The Spaghetti Factory is a family favorite and tradition. We've been going to the Spaghetti Factory in Newport Beach for as long as I can remember. Every time we go, we all order the same thing. Spaghetti with Browned Butter and Mizithra. It's Uh-Mazing.

If you haven't tried mizithra, get on the bandwagon already! It's delicious!
Put it on pasta, veggies, pizza, fish or just pile some mizithra on top of mizithra and eat that. You can't go wrong. 
I wanted to copy-cat the Spaghetti Factory's recipe but I wanted to add some elements that I though would enhance the dish...pinetnuts, garlic, parsley, pepper, etc.

Alright, let's get started on making some pasta! This is wifey material here! Remember, the key is to have good ingredients: good cheese,  fresh garlic and if possible, homemade or fresh pasta- I bought my ingredients from a local italian market where they make the pasta in house. It's good. Really good.

P.S. Use a fine grater for the mizithra cheese, but note, don't try to use the lemon zester on your grater like I did. I couldn;t figure out why my cheese wasn't grating. Duh. Me and my amateur moves!

When browing the butter, keep a watchful eye. You just want to carmelize it a bit. Think caramel colors.


Prep: 5 minutes | Cook: 10 minutes | Yield: 2 servings
Ingredients:
1/4 pound spaghetti
1/4 cup butter
1/2 - 1 cup mizithra, depending on your love of cheese
2 tablespoons pinenuts
2 cloves garlic
1/4 teaspoon fresh black pepper
1/8 teaspoon oregano
1/8 teaspoon parsley or something pretty and green for topping

Directions:
Bring a large pot of salted water to a boil, add pasta. While water is heating up or pasta is cooking, finely chop garlic and set aside. Use a fine grater to grate mizithra, set aside. In a small skillet, turn heat to medium and add butter diced into small pieces for quick melting. When butter is completely melted and starting to bubble, add garlic. Don't add garlic too soon or else it will burn. Stir the butter and garlic mixture often until the butter is a golden caramel color.

When pasta is al dente, remove from heat, drain and return pasta to original pan. Add the browned garlic/butter mixture, mizithra cheese, oregano pepper, pinenuts and mix well. Top with some extra pinenuts and oregano to make it look pretty. Presentation is half the battle.

Related Posts Plugin for WordPress, Blogger...